Hello everybody, hope you are having an amazing day today. Today, we’re going to make a distinctive dish, pork kimchi cooked rice for parties. One of my favorites. This time, I am going to make it a little bit unique. This is gonna smell and look delicious.
How to make Kimchijjim (or kimchi-jjim, kimchi jjim), Braised Kimchi from Maangchi.com. Today we're going to make kimchijjim, which is braised kimchi with pork and/or with mushrooms. It's a delicious, savory side dish for rice that's hearty, meaty, spicy & addictive!
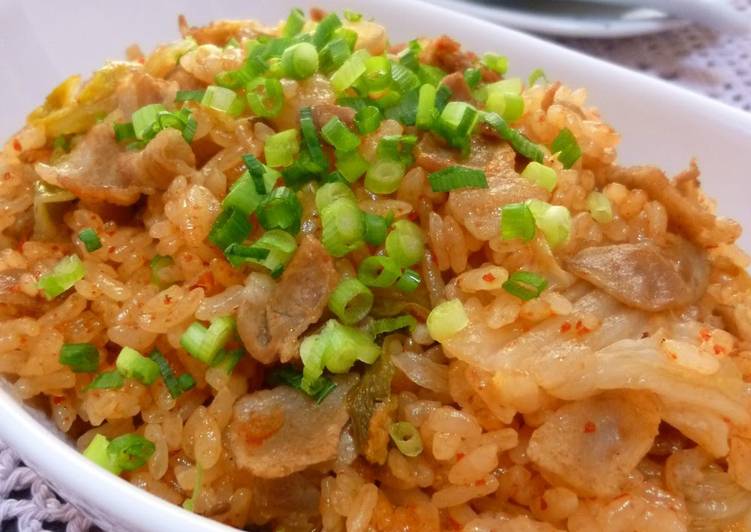
Pork Kimchi Cooked Rice for Parties is one of the most favored of recent trending foods in the world. It is appreciated by millions daily. It is simple, it is quick, it tastes delicious. Pork Kimchi Cooked Rice for Parties is something that I’ve loved my whole life. They are nice and they look fantastic.
To begin with this recipe, we must first prepare a few ingredients. You can cook pork kimchi cooked rice for parties using 10 ingredients and 7 steps. Here is how you cook that.
The ingredients needed to make Pork Kimchi Cooked Rice for Parties:
- Prepare 700 grams White rice
- Take 130 grams Napa cabbage kimchi
- Prepare 120 grams Pork belly (thinly sliced)
- Make ready 1 tbsp ★Yakiniku (Japanese BBQ) sauce
- Get 1 ★Salt and pepper
- Take 1 tsp ★Sesame oil
- Take 1 tbsp ☆Sake
- Make ready 1 tbsp ☆Ketchup
- Get 1 tsp ☆Soy sauce
- Prepare 1 dash Toppings such as Japanese leek etc.
Pork belly kimchi stew (Kimchi Jigae) is a popular Korean comfort food. It's a delicious cold weather recipe for sharing and very easy to make at home! The only thing I want to remind you when using a ceramic pot is always cook on low to medium heat, never cook with high heat. Flavorful strips of pork shoulder are marinated in a spicy-sweet sauce, then stir-fried with kimchi.
Steps to make Pork Kimchi Cooked Rice for Parties:
- Wash the rice and let sit in a sieve for about 30 minutes. Cut the pork into 1 cm cubes. Cut the larger pieces of kimchi. (I use it as-is).
- Sauté the pork in sesame oil, and season with yakiniku sauce, salt, and pepper.
- Add the rice and the ☆ seasoning ingredients into the rice cooker, add water up to the two cup marker, and lightly stir. Place the pork on top, and switch on the rice maker.
- Cook via the normal or mixed rice mode, and it is done. It will cook a bit hard. Please feel free to increase the amount of water.
- Arrange onto plates, top with green onion, and it is done. It is also nice to top it off with Korean seaweed, a fried egg, or a soft-boiled egg.
- I recommend using kimchi that is well-marinated and has a rich flavor. I think Korean-produced kimchi is the best.
- Bit of wisdom on the effects of using ketchup as a secret ingredient: The acidic glutamine gives it an elegant flavor. You can also look forward to the benefits of antioxidants thanks to the lycopene.
Lettuce leaves and cooked medium-grain rice, for serving. Kimchi fried rice, also known as Kimchi Bokeumbab in Korean, with beef is topped with a fried egg Heat a wok or large skillet over medium-high heat and add sesame oil; cook and stir ground beef I used the recipe out of the magazine which called for ground pork Everything went together just fine. Kimchi fried rice is mostly enjoyed at home, but you might also see it in some casual Korean eateries. Quick, easy, and cheap to make, kimchi bokumbap is simple Korean home cooking at its best. Kimchi fried rice can also be made vegetarian by substituting tofu squares for the pork, beef.
So that’s going to wrap this up for this exceptional food pork kimchi cooked rice for parties recipe. Thank you very much for reading. I’m confident that you can make this at home. There’s gonna be interesting food at home recipes coming up. Don’t forget to save this page on your browser, and share it to your family, colleague and friends. Thank you for reading. Go on get cooking!